Got plenty of empty champagne bottles at home? Gather them together because you will be making projects using them! There are tons of ideas you can follow to recreate a project using a champagne bottle. You only have to choose which is best for your home.
From home decorations to improvements, champagne bottles can do the job. Your creative juices are put to test in creating these amazing projects. However, if you cannot think of any idea yet, we are here to help! We will give you a list of crafts you can try at home. So, let us explore each idea in detail below.
Creative Ways to Use Champagne Containers
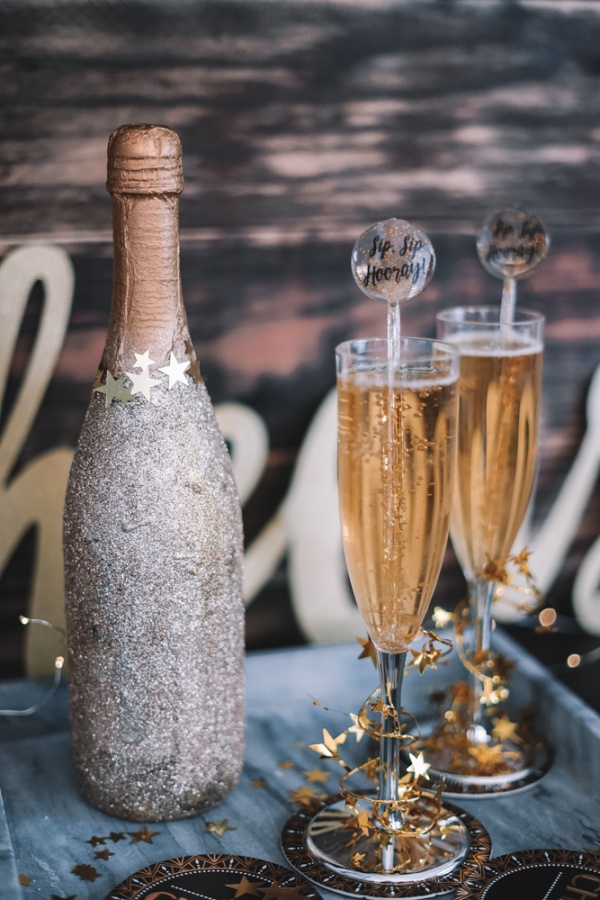
1. Gold-Glitter Bottle Decor
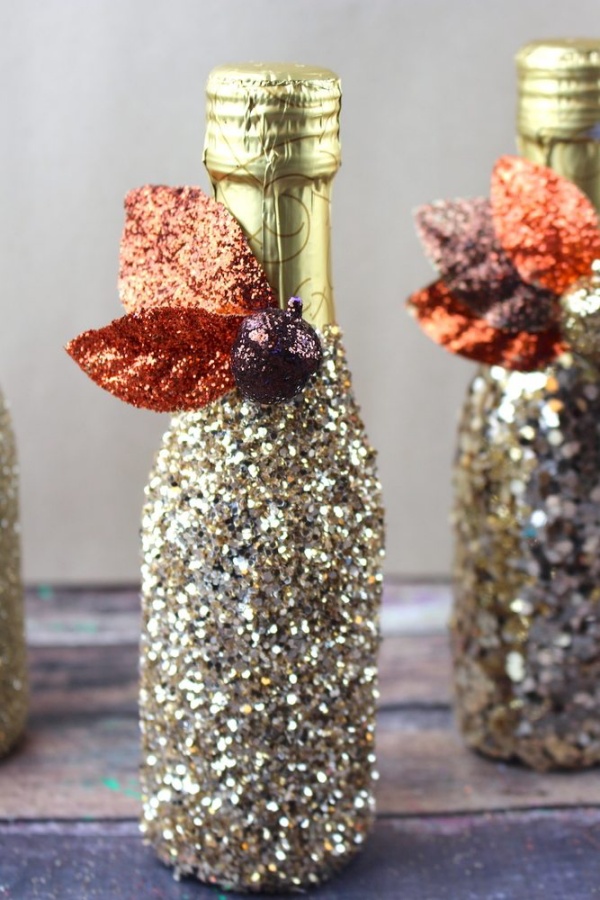
Want to create a luxurious and classy bottle decor at home? Try this gold-glittered bottle decor! It can be a perfect centerpiece or a solo decor on your shelf.
What you need to achieve in this project is to get that ombre effect. All you need is the champagne bottle, glitter and metallic spray paint, and a ribbon.
- To start, spray metallic gold paint on the bottle as a base coat. You do not have to include the neck, just the lower body of the bottle.
- Spray from bottom to top to achieve the fade-out effect. Leave it to dry. Make sure that each time you spray, you have to let it dry first.
- Spray glitter paint on the bottle. Again, start from bottom to top. Do not cover the entire gold paint, just the lower half.
- You can repeat another coating of glitter to achieve the fuller coverage.
- Tie a white ribbon around the bottle’s neck.
2. Bookshelf
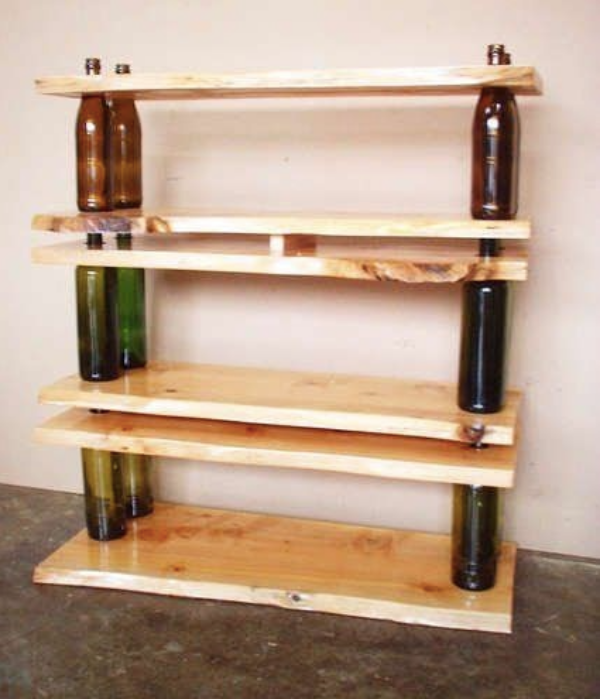
If you have a lot of books that need proper storage at home, this project is for you! What you need for this are the bottles, wood, and glue.
- To make this project, secure the size and shape of wood for your shelf. The number of wood depends on the size of the shelf you want.
- For the base of each layer, you will need four bottles, two for each end. Drill each wood with four holes, two for each end. Make the hole is enough to fit the neck of the bottle.
- Do the previous step for the remaining layers of wood. You will also need some pieces of wood without holes.
- Smoothen the hole’s edges using sandpaper.
- To assemble the shelf, use the wood as the base. Do not drill this.
- Apply a lining of glue around the bottom of the bottle.
- Stick the bottom of the bottle to the wood. Do this for the other three bottles. Make sure the bottles are in the perfect distance for the next layer of wood. Leave it to dry.
- Top the next layer of wood in the bottle. Make sure to insert the necks of the bottles into the holes.
- Measure the length of the bottles that are sticking out on the next layer.
- Cut a piece of wood based on the length mentioned in the previous step. The width should be 2-3 inches. You will need this for support on the layers.
- Apply a lining of glue to each bottle’s mouth and the small wood for support. For the wood, place it on the center, and the glue should be on the top and bottom parts.
- Carefully place a layer of wood without holes on top of them.
- Repeat steps 6-12 until you achieve the number of layers for your shelf.
3. Bottle Torch
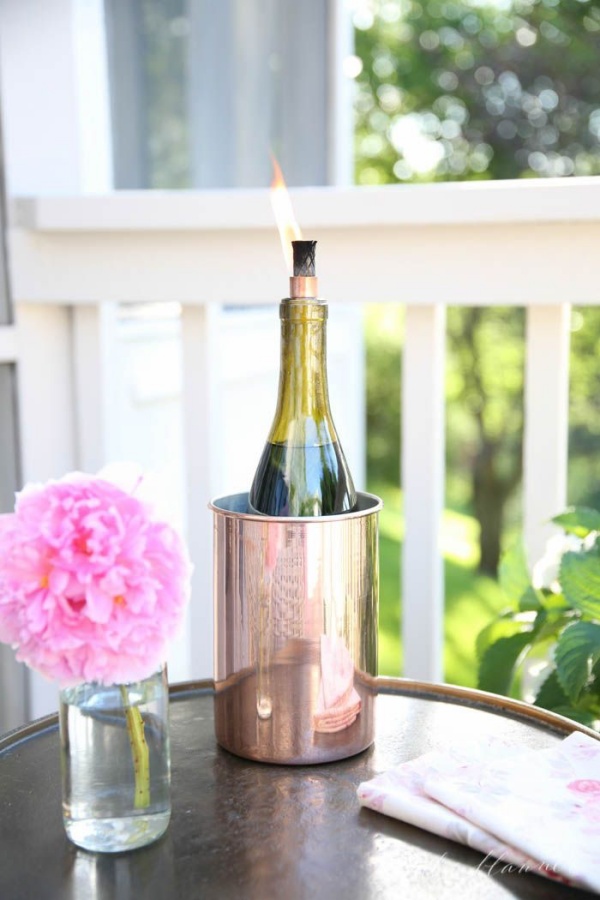
Love to hang out in the garden or porch at night? Make this bottle torch to light up your every night! The steps to make the torch are easy and simple.
- First, you need the bottle, copper coupling, fuel, wick, and nylon seal tape.
- Use the tape to wrap a small part of the coupling, just enough to fit the bottle’s mouth.
- Slide the wick through the coupling. Leave a 1-inch wick at the top.
- Fill the bottle with fuel.
- Insert the wick’s bottom into the bottle.
- Make sure the coupling fits the bottle’s mouth properly.
- Light the wick at the top.
If you think you need more bottles to create a torch, you can purchase high-quality ones. Try this champagne container customization company; they offer champagne bottles in different sizes, shapes, and colors you can select from. Having different types of bottle torches in your garden creates that feeling like you are camping in the woods.
4. Souvenir Item
Looking for souvenir ideas you can customize to give to your friends? Try this champagne bottle souvenir! You will not need a lot of crafting to make this because it is extremely easy and quick.
This craft idea is perfect for unopened bottles. The theme for the souvenir entirely depends on you. You can go classic, funny, romantic, or even artistic!
For our example, we are going to create a vintage bottle souvenir. What you need are the bottle, ribbon, straw, and tag.
- Look for a straw with a vintage design.
- Tie a polka dot ribbon around the bottle’s neck. Do not tighten it hard yet.
- Insert the straw in a slanting position.
- Tighten the ribbon a little bit, enough to hold the straw.
- Attach a small tag on the straw with a one- or two-word message.
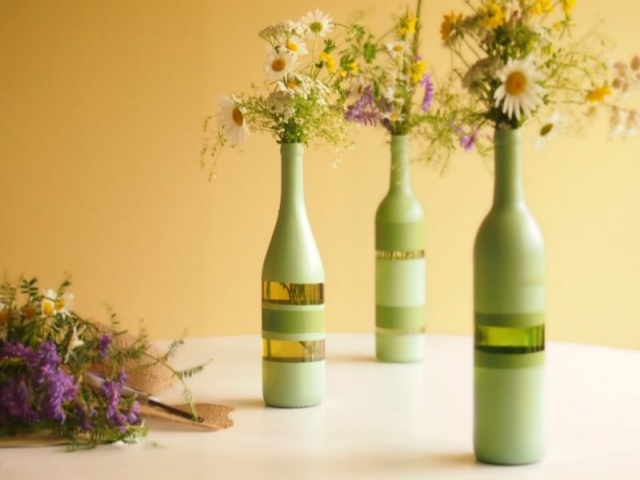
5. Bottle Planters
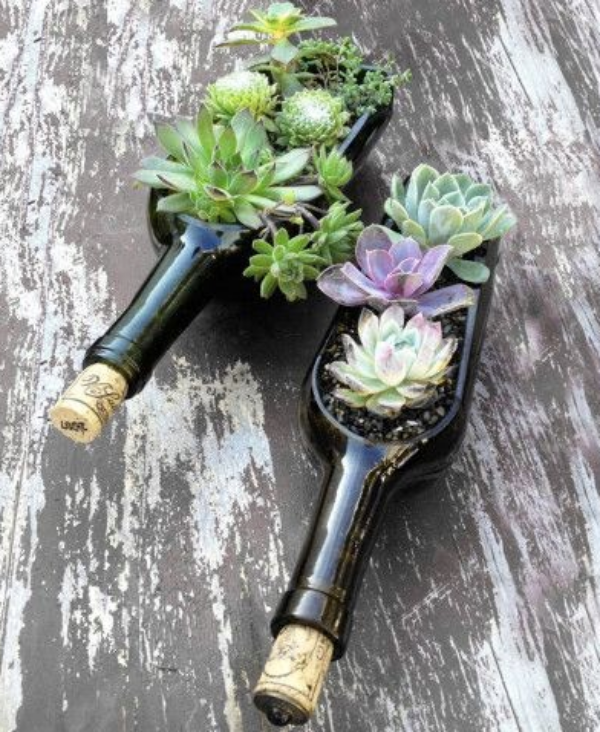
Beef up your home garden with this bottle planter project! You are going to cut open the bottle to create a perfect space for your plants. You need a cutter to achieve the project.
- First, lay the bottle and create a marking on its body. This is where you are going to cut open the bottle.
- Follow the marking when cutting the glass.
- Smoothen the edges with sandpaper.
- Place the soil in the bottle and then insert the plant in the soil.
6. Champagne Bottle Light
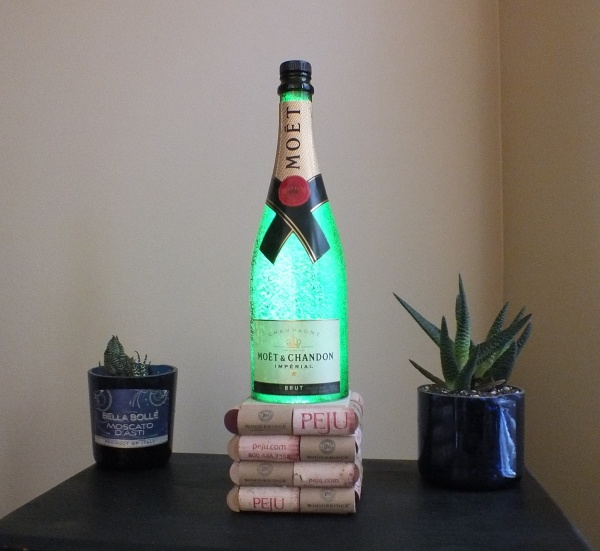
What about having a centerpiece that lights up? Sounds fantastic, right? You can create your own using a champagne bottle! You need these for the project:
- Christmas lights (short strand)
- Masking tape
- A drill
- Champagne bottle
Follow these instructions:
- Use masking tape on the bottle to mark the spot where you want to drill. With the tape, the drill will not slip.
- Drill the glass carefully. It may take half an hour.
- Rinse the bottle, especially the part where you drill the hole. Leave it to dry.
- Insert the lights into the hole, leaving the plug outside.
7. Sparkly Champagne Bottle
Want to create a rich and luxurious home decor? This sparkly champagne bottle is a perfect choice! All you need is a lot of golden rhinestones to achieve the sparkly look.
- To make this rich decor, you have to think about your style first. Whether you want to cover the entire bottle with the gem or just a portion of it is up to you.
- Gather the materials: the bottle, rhinestones, and glue.
- Start applying glue on the gem and stick it to the bottle based on your design.
- Leave the bottle to dry before displaying it.
Conclusion
Champagne bottles can come in handy when you need to improve your home. What you need are ideas on how to use them. With the craft ideas above, you will have a good start in maximizing the use of the bottles. So, follow the methods above and create some uniqueness at home!