When a user is uploading a file to a website, they will always want to see the uploading status of that file in the screen. As most of the users are impatient so they can’t wait for the uploading process going on in the background of the website. Instead of that when they see the uploading status they get sure that their file is getting uploaded. And some users may also think that because of their slow internet connection the file is not being uploaded. Actually providing a website with progress indicator gives the users great information and from that they can know what is going on.
So now coming to technical side, this is not as simple as it is sounding. To activate this in a website it needs a lot of knowledge. First of all the size of the file should be obtained, then some calculations are to be done against the directory of the server where the file will be uploaded. But this is not enough the original work of a developer will start from here.
Suppose if the file being uploaded is an image then JavaScript can access the file name, format and dimensions. But one major thing is missing. The size of the file can’t be accessed by JavaScript. Now here comes the work of HTML 5. HTML 5 has made it possible to access the size of a file which s being uploaded. But still problem lies on HTML 5 because it is not supported by many modern browsers. No need to worry about as there are more alternative methods that will help you out. Flash, ActiveX plug-in, Java, PHP Cache extension are all these alternative methods. But for such a small task it will better way to use PHP. As PHP 5.4 came with a lot of new configuration directives session.upload_progress
The whole process s not so tough using PHP as you will just need some to spend with an upload form, JavaScript, CSS. But before doing that, you should have a clear idea that how it works in your website. Then step by step we will discuss about creating the feature.
Tracking Upload Process with PHP and JavaScript
• Session Upload Progress:
There are many requirements you will have to look after in the whole process. But first of all you will have to see that the session.upload_progress.enabled directive must be enabled on your website and compulsorily there must be hidden field in your web form with the name specified by session.upload_progress.name directive. When your session.upload_progress.enabled is true and $_FILE (session.upload_progress.name) is sent at the time of upload, information about the file transfer is made available in the $_SESSION superglobal array. The print_r() output of the same file will look like this during the file transfer.
![]()
Make sure that the settings in your php.ini file allow large file uploads. Specially the two directives, post_max_size and upload_max_filesize.
• Creating the Form:
Here we will give the demonstration of a simple form which will be able to upload only one file at a time. So let’s go to the process of creating an upload form. Create a form.php file and paste the below code in it.
![]()
Now let’s demonstrate the work of the above code. I think there nothing much to tell you all about the head section and now I am directly coming to the body section of the whole code. You can see at first the “bar_blank” it is actually the container of the progress bar. Then next you will get “bar_color” it will directly update with the file upload progress. And after that the “status” value will display the numeric value of the percent uploaded.
The whole form is set to submit target attribute points to the hidden frame element and to the same URL. Actually submitting the form in a hidden frame allows keeping the visitor in the same page while the work will go on in the background. This is a common practice when doing “Ajax File Uploads” since it is never possible to send the contents of the file directly using JavaScript.
Within the form, special hidden field needed to populate the $_SESSION array appears, which is again followed by the file upload input and submit button. Submitting the form will trigger a JavaScript function named startUpload() which will be defined by the included JavaScript File.
At the bottom is the hidden frame to which the form will post and import the script.js file.
• Adding Some Style:
This part is all about the CSS styling and it is very simple to create. You have to just create the style.css file and add the following code.
![]()
• Client Side Functionality:
Here first of all the Script.js file contains six functions. These are given below in the code. Some prefers to use jQuery process but we will recommend using the basic process.
![]()
• Real Time Progress:
Now we are on the last file that will bring all the things together in the progress.php file.
Add the following code in the file. It will do all your work
![]()
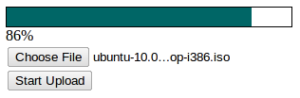
This is a screenshot of the status bar that how it will look like.
Probably now you have understood the whole process of adding the feature of an upload process in your website. So now you can experiment more on the process to add some extra features like uploading multiple files at a time, cancelling the upload etc. So you are fully done. Cheers!